
Implementing the beGadgets to your Website
Implementation Recommendations
Implementing the beGadgets to Your Website
The implementation process of the beGadgets is as follows:
- • You will need to provide Impart Media with the Staging Domain URL (testing environment where the integration would be developed).
- • beDigital will then issue an authorisation key. This key must be used in your beGadget's script call, otherwise your gadgets will not display on your staging domain.
- • Review the below recommended Best Practice Guidelines, including example sites.
- • Ensure you have purchased an SSL Certificate to ensure your Booking Gadget displays in browser over HTTPS without any security warnings.
- • Ensure the gadgets are responsive on all devices.
- • Advise Impart Media when you are ready for us to review and test the beGadget integration (please allow us a 3-5 day window to do this)
- • Request a live gadget key & provide the applicable domain (you require a separate authorisation key when going into production in order for the beGadgets to display on your live production domain).
beGadget Documentation
You should familiarise yourself with the information contained in our Gadgets Documentation before attempting to implement the beGadgets.
Below are our key recommendations as the objective should be to:
- • provide an excellent user experience
- • provide a seamless & simple booking flow
- • generate strong booking conversion
The documentation contains all of the necessary information required to complete integration projects using default gadget features.
Each type of gadget has a dedicated page within the documentation which contains detailed information. This information includes a list of all the available configuration parameters, which can be found below the main information in each gadget page, plus details of any inputs that are required and an explanation of how each parameter works.
Please ensure you read this documentation through carefully before requesting assistance in managing beGadget functionality for your development. There is an allocation of time included in the beGadgets licence, for technical assistance, however this does not extend to items that are already documented. Assistance provided for elements clearly documented may incur charges.
Implementation Requirements
Homepage
Position the Search Gadget in a prominent position within the first fold of the homepage, ensuring a strong and clear 'call to action'.
Styling
Ensure the beGadgets are styled to best complement your site's theme (i.e. Filters pane, Action Buttons, styling, borders, colour palette, etc) to provide a seamless experience for your users.
One of the primary advantages of inserted gadgets such as these is that you, the implementer, can use CSS on your site to change and mould the appearance of the gadgets to suit your site. The majority of styling requirements can be achieved only using CSS. There are also a number of alternatives for those with more complex needs.
beGadgets are highly customisable by using only CSS styling. Responsiveness can be achieved in the same manner as bootstrap, by using the same breakpoints (eg. http://getbootstrap.com/css/#grid-options)
To make it easy to figure out what CSS selector you need to address a particular part of a gadget, make a test page, then use Firefox and the add-on Firebug (the HTML tab). This tool is invaluable for figuring out what the DOM looks like after the gadget is running. Chrome, Safari, Opera and IE also have good developer tools for this purpose.
We've created a sample CSS file that highlights the things you may want to re-style. This file is primarily a guide and only covers a few elements in each gadget, so if you're looking to restyle something that isn't in this file, check above for developer tools.
If you wish to create your own styling of the gadgets you can load the beGadgets with minimal CSS or no CSS at all and build your own styling from scratch.
Simply insert the below script above your gadget insertion on the page:
<script type="text/javascript">
            BEcssOverride = "none";
        </script>
Or:
<script type="text/javascript">
            BEcssOverride = "minimal";
        </script>
Some samples of different beGadgets styling are below:
https://www.tourismtopend.com.au/
https://www.visiteastgippsland.com.au/
https://www.mclarenvaleandfleurieucoast.com.au/
http://www.ministryofvillas.com/
http://www.margaretriver.com/
http://www.alps2ocean.com/
http://www.ozbook.com.au/
http://www.parkstay.vic.gov.au/
http://www.mackayregion.com/
Display all bookable product
The 'showAll' parameters should be enabled as a default to both the REGION and ITEM Gadgets. Specifically showAllAccom | showAllTours | showAllEvents. This will display the operators' product regardless of availability to entice consumers to continue searching and generate more bookings. Having these applied will also ensure that users will not see the message: "Sorry, no results match your search criteria. Please change your dates and options and try searching again."
Hide or remove Operator contact details
Bookable operator profiles should not display PHONE | EMAIL | WEBSITE details. This is proven to be a large hindrance for a destination to generate online bookings. If required, we strongly suggest these details be buried down the bottom of the page or require an action to prompt their display. Non-bookable operators, however, can display contact details without issue.
Operator Page Layout
Operator pages must include images, description, point of difference, location and cancellation policy as well as the Item Details Gadget. Facilities and other details are also recommended. Ensure the operator pages are clear, informative and have the Items Gadget located in a prominent position on the page, as with operator imagery (which is a proven feature to selling more).
Responsive Gadgets
Mobile browser width needs to be fixed for all search results to avoid visitors needing to scroll horizontally.
Cart Icon
All pages must include a cart icon so that the user can check-out at any time.
Loading Animation
All gadgets should include a loading animation. This should be displayed when the gadgets are loading, in the case of the Region and Item Details Gadgets, or when an action is underway, in the case of finalising payment on the Booking Gadget.
Default Sort
Default the 'Results Gadgets' sort order to 'Instant' or 'Available'. I.e. Gold Operators over Request Based. This will entice real-time bookings from your consumers and will entice your operators to transition from '24hr' to 'Instant'.
Implementation Recommendations
Booking Call to Action on all pages
Implement a Search Gadget on most if not ALL pages within your site (again should always be within the first fold of the page to attract action).
Itinerary Summary PDF
By default the PDF summary that is generated from a successful booking will have the following sections:
Header
The business name and contact details associated with the Visitor Centre ID (VCID) that was used in the Booking Gadget
Thank-You Message
A custom message that can be configured in the Bookeasy console
Itinerary Summary
A summary of the booking and customer details
Itinerary Items
An itemised list of products that have been purchased
Terms and Conditions
A custom text field that is configured in the Bookeasy console
The PDF summary may also have the below details:
Itinerary PDF Header Image
It is possible to add your own logo to the top of the Itinerary PDF summary. To achieve this, this first step is to create a CSS file which contains a reference to the desired logo image. Eg:
#HeaderContainer { width:100%; height:300px; background:#FFFFFF url(../images/itinerary-logo.jpg) no-repeat center top; }
It is recommended that the CSS height be used to provide sufficient vertical space to comfortably display the logo image. It is also a good idea to centre the image using the background attribute.
The final step is to supply an additional parameter 'itineraryCSS' to the booking gadget. This parameter takes a string value which is a link to the custom CSS file created in the previous step
<script type="text/javascript" src="//gadgets.impartmedia.com/gadgets.jsz?key=xxxxxxxxxxxxxxxxxxxxxx"></script>
<script type="text/javascript">
// Start Gadget initialisation code
$w(function() {
BE.gadget.book('#bookingGadget',{
vcID:XXX,
itineraryCSS: '/css/itinerary-pdf.css'
});
}); // End Gadget initialisation code
</script>
Recommended Parameters
showAll
showAllAccom | showAllTours | showAllEvents should be applied to both the Region and Item Gadgets.
This should be applied so in the scenario when a user visits an operator profile directly or further inspects an operator that does not have availability for all dates selected, they will not see the message: Sorry, no results match your search criteria. Please change your dates and options and try searching again.
bookingStatus
This is nice customisable feature that allows you to modify the default 'Sold' term to something more enticing to promote more bookings. Terms such as Enquire | Request | or even the VIC's Contact Number are encouraged instead of the default.
Inline parameters
These are parameters that will enable the display of the operator's descriptions inline rather than a hover, which is far more mobile friendly and strongly encouraged. This would be a default feature, however cannot at present due to some clients' interpretation of the gadgets styling.
Region:
• showRoomDetails: true
• showRoomDetailsInline: true
• showHoverInline: true
Item:
• descriptionHover: true
• showHoverInline: true
showRoomDetails
At the Region Gadget level, you can apply a parameter that allows the user to view the operator's product on the same page rather than having to drill down to the Operator Profile and perhaps back again. When applied, and should the user select Book Now against the product itself, the user will bypass the Operator Profile altogether and be taken directly to the Booking Gadget, meaning reduced steps to actually make a reservation. If they want more information, the user can select the Operator Name and be taken to the Operator Profile as per the default process.
Best Practice
To ensure the site is designed to attract optimal viewing and maximise conversion rates, we encourage the following guidelines to the beGadget integration:
- • Position the Search Gadget in a prominent position within the first fold of the homepage, ensuring a strong and clear 'call to action'.
- • Implement a Search Gadget on most if not ALL pages within your site (again should always be within the first fold of the page to attract action).
- • Ensure the beGadgets are styled to best complement your site's theme (I.e. filters pane, action buttons, styling, borders, colour palette, etc) to provide a seamless experience for your users.
- • Default the 'Results Gadgets' sort order to 'Instant'. I.e. Gold Operators over Request Based. This will entice real-time bookings from your consumers, and will entice your operators to transition from '24hr' to 'Instant'.
- • Operator Profiles should not display the operator PHONE | EMAIL | WEBSITE details if they have bookable product. Doing so is proven to be a large hindrance for a destination to generate online bookings. If required, we strongly suggest these details require an action to prompt their display.
- • Ensure the Operator Pages are clear, informative and have the Items Gadget located in a prominent position on the page, as with operator imagery (which is a proven feature to selling more).
- • Set your sites' default search nights to 3, 5 or 7 depending on how they render. This provides that 'grid view' that is deemed industry common, doing so should entice longer stays as well as generate more bookings due to increased transparency.
Testing your implementation
The Pre-Version Testing (PVT) environment makes it possible to test the booking and confirmation gadgets without affecting real world operator data or availability.
In order to tell the gadgets to use the PVT environment you will need to do the following two things
(1) Update the gadget script URL
You need to add -pvt to the gadget script reference
<script type="text/javascript" src="//gadgets-pvt.impartmedia.com/gadgets.jsz?key=41376e9376f68f96033c8aa20aeebd15"></script>
(2) you also need to add an override variable BEFORE you include the gadget script library above so that the gadgets know to use the PVT data source
The updated gadget code will look something like this
<script>
 BEurlsOverride = {
 cdn:function() { return "//gadgets-pvt.impartmedia.com/"; },
 sjp:function() { return "//sjp-pvt.impartmedia.com/"; },
 webapi:function() { return "https://webapi-pvt.bookeasy.com.au/"; },
 };
</script>
<script type="text/javascript" src="//gadgets-pvt.impartmedia.com/gadgets.jsz?key=41376e9376f68f96033c8aa20aeebd15"></script>
<script>
 $w(function() {
 BE.gadget.details("#itemGadget",{
 vcID:201,
 type:"accom",
 productID:93838
 });
 });
</script>
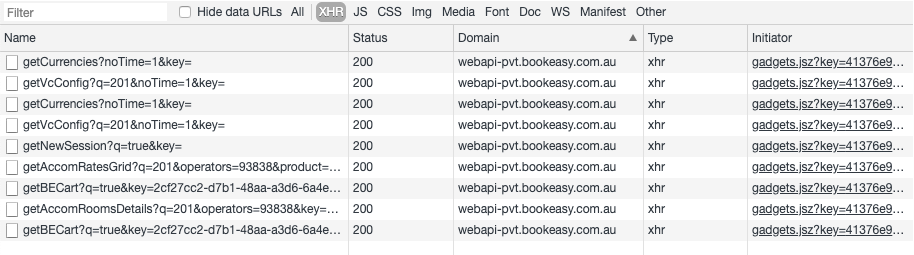
You will know if PVT mode is enabled correctly if the "Network" tab in the developer tools window shows the PVT domain as the source for all XHR resources
Other Considerations
-
• Be wary of other elements as 'Site Search' and 'Business Directories' when integrating the booking engine. It is imperative to avoid duplicate Operator Profiles and ensure a seamless user experience.
- • To ensure the beGadgets propagate on your website, ensure that you redirect your website's non-www domain URL to the www domain URL (or vice versa, depending on which domain URL version you have been provisioned a beGadget Authorisation Key for). For example, if beDigital has provisioned a beGadget Authorisation Key for www.yourdomain.com, ensure that you redirect yourdomain.com to www.yourdomain.com. If you don't then anyone landing on the yourdomain.com version of your website will not see the beGadgets displayed and will be unable to make bookings. This will also assist your website's SEO and search engine indexing.
Inter-gadget communication issues
Due to the inter-gadget communication that occurs (some beGadgets rely on the existence of others), you can not have more than one instance of each gadget component initialised on a single page.
Avoid placing two gadgets on the same page within your site. The only exception to this rule is that the Cart Gadget can exist on the same page as other gadgets, but it cannot be on the same page as the Booking Gadget.
This is a common error and some sample code to disable the cart on the booking page is below:
<?php if ( !((JRequest::getCmd('option') == 'com_bookeasy') && (JRequest::getCmd('view') == 'book')) ) : ?>
<div id="toolbar-cart"><span id="empty"></span></div>
<?php endif; ?>  )
beGadget Integration Examples
For inspiration via other beGadget interpretations, we would encourage you to peruse:
- https://www.discoverrenmark.com.au/
- https://www.mclarenvaleandfleurieucoast.com.au/
- https://www.visiteastgippsland.com.au/


